How to use your fingers on the keyboard
Typing on a computer requires the use of both hands, to type in the most correct and functional way , and therefore to save time, especially if you have to type large portions of text on the computer, but also to best protect the tendons in the hands and thus avoid pain and discomfort that could result from incorrect movements.
The first thing you need to pay attention to is the position of your hands in relation to your keyboard . Both hands should rest on the keyboard, and the tips of your fingers should be positioned so that they can touch the keys. This may not be easy at first, but as with everything, a little practice will be enough to get the hang of it!
The perfect position is the one that allows you to add the most lateral keys directly with your little fingers , an operation that is also advantageous because it allows you to save precious seconds during the typing phase.
The arms should always be straight , supporting the individual movements of the hands and fingers. The elbows should always be slightly away from the body, to allow for proper movement and to avoid over-tiring the limbs.
Protecting your tendons is also essential when typing on a computer. Your wrists should never be bent, and your hands should always be in line with your forearms. As for general posture, it’s best to always keep your back straight and ensure the top of the screen is level with your eyes.
Depending on each person’s posture, you can rest your wrists on the computer or not. In fact, if you can rest your forearms entirely on a surface, your overall posture will be positively affected.
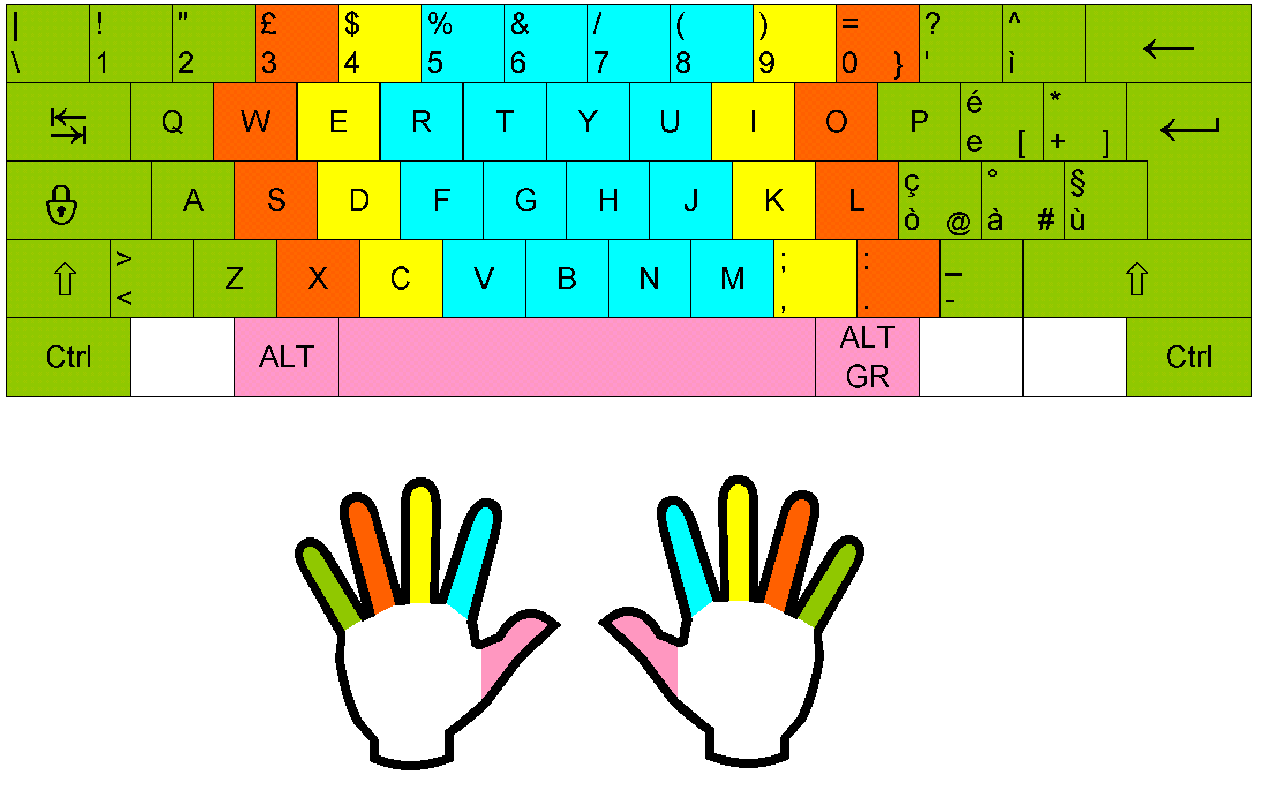
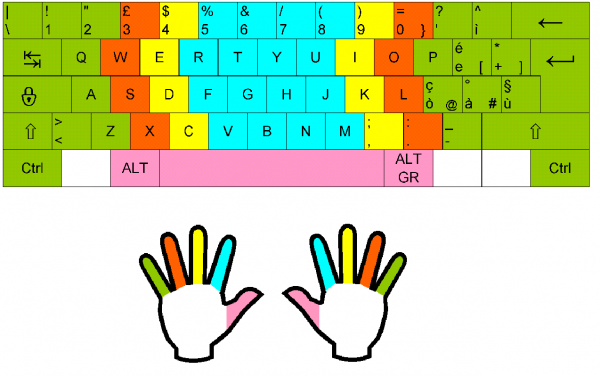
Now let’s look at the correct finger placement on the individual keys. Following the Italian layout of the letters, the little finger, ring finger, and index finger of the left hand should rest on the a, s, d, and f keys respectively , while the index, middle, and ring fingers of the right hand should rest on the j, k, and l keys . The thumb, on the other hand, is used to insert spaces with the slash at the bottom.
This is the basic position. From here, your fingers will move gradually to reach all the other keys. For uppercase or lowercase letters, simply press the appropriate key with your left ring finger.
If you want to practice using your keyboard correctly , you can practice with some very simple but extremely useful exercises to improve your typing performance on the computer. For example, you can print a page of written text that contains a bit of everything: accented letters, capital letters, and special characters.
The goal is for you to become comfortable typing quickly and easily, without having to check each key. Another goal of the exercises is for you to be comfortable using all your fingers.
To do this, you need to study the entire keyboard thoroughly . Start from the bottom row, the one containing the space and the commands for uppercase letters, and proceed upwards, trying to memorize the position of each individual letter.
Then, when you feel ready enough to begin the exercise, go ahead and type the sentences , paper in hand . Don’t worry if, initially, you’ll naturally glance at the keyboard. It’s a natural reflex and perfectly normal for those who don’t type every day or for long periods of time on a computer.
If you have already memorized all the keys, perhaps because you type on the computer every day and your visual memory is sufficiently trained, then proceed with the exercise regarding the correct posture of the hands, wrists, forearms and fingers .
Keep trying, don’t lose heart, and you’ll see that in no time at all, typing numbers and letters on the keyboard, even without peeking at the keyboard to see the individual keys, will be a natural and simple operation for you.